
The Ultimate SEO Guide to Magento 2
Magento is an incredibly powerful platform, but in order to make the most of it you need to configure it properly. This guide shows you how to do exactly that, zooming in on:
- Creating a SEO-friendly URL structure
- Configuring page titles and meta descriptions correctly
- Using headings correctly.
- Taking search engines by the hand when they’re crawling and indexing your store.
- Speed optimizing.
Magento, founded in the United States in 2008, has become a leading eCommerce platform worldwide. That position was strengthened further with their acquisition by Adobe in 2018 .
It’s estimated that around 270,000 stores run on Magento world-wide. And according to Magento, they enabled their merchants to earn $155 billion in revenue in 2018 . It’s safe to say that Magento is a household brand in eCommerce land.
While Magento 2 is a very powerful platform, if you’re running on its default settings, you’re not going to get great SEO performance out of it. That’s why you need to put yourself in the position to win, and by applying all the best practices for Magento 2, you do just that.
In this article, we’ll explain step-by-step what you need to do in order to get your Magento store into top shape, all set for maximum SEO performance.
What does it take to make your Magento store rank well?
In order to rank your Magento store well in the organic search listings, you need to make sure search engines can easily and efficiently find all your content and make sense of it, and that they have reasons to rank your content higher than others.
We can break all this down into the so-called “Three pillars of SEO”:
- Technology: the technical foundation of a websiteWebsite
A website is a collection of HTML documents that can be called up as individual webpages via one URL on the web with a client such as a browser.
Learn more, which helps search engines find and understand your site as quickly and efficiently as possible. This is about setting yourself up for success. - Relevance: what search queries your content is relevant for. This is done by creating content that’s useful and satisfying for your visitors. Good technology is essential in order to communicate relevancy clearly.
- Authority and Trust: links to your website; these determine your authority and trustworthiness.
This article describes the first pillar, Technology, in detail, as this is platform-specific, while Relevance and Authority and Trust work the same for every platform.
A Magento SEO checklist for a strong technical foundation
A strong technical foundation enables search engines to find and understand all your content easily and efficiently.
Think of a site’s technical foundation like a structure's foundation. Having a solid foundation benefits the entire structure. Alternatively, having a shaky foundation causes the whole structure to fall down.
Here’s the breakdown of things you have to do or address to get the technical foundation right in Magento 2:

Magento has a strong ecosystem of extensions that can usually fulfil SEO requirements that would otherwise be a heavy burden on your development team. When working on the SEO for a Magento installation spending time to understand your requirements and how a specific extension might be able to help support with your requirements is a great use of your time - you’ll save a huge amount of development overhead for your teams and likely have more flexibility in the long term deployment and maintenance. The extensions offered by Amasty, Mageworx, Wyomind and Weltpixel we’ve had great experiences with.
Defining a SEO-friendly URL structure
A good URLURL
The term URL is an acronym for the designation "Uniform Resource Locator".
Learn more structure is one that works well for both visitors and search engines.
In a nutshell, your URLs need to be:
- Descriptive and easy to read
- Brief
- Consistent
- Lowercase
Website redirects and URL rewrite settings
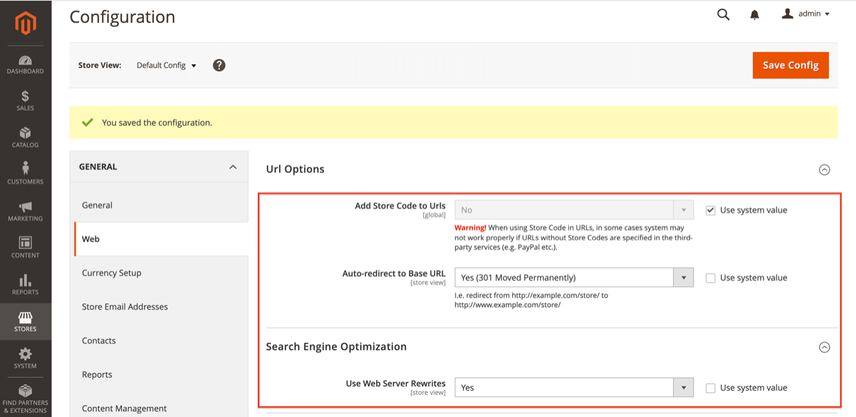
You can manage a store’s redirects and rewrite settings by logging on to your Magento backend and navigating to:
Stores>Configuration(underSettings) >General>Web.- At the top of the pagePage
See Websites
Learn more, select the right Store View you want to adjust the settings for. In our example this isDefault Store View. Note: changing the settings on a higher level impacts other store views, so be careful with that. Read more on this here . - Under
Url Optionsyou’ll find the fieldAdd Store Code to Urls. Keep its value set to it’s default:Noto make sure URLs are descriptive and easy to read. - The field
Auto-redirect to Base URLenables you to automatically redirect visitors and search engines when they request your store without the subdomain (e.g. whenhttps://www.example.comis requested, clients are forwarded tohttps://example.com), or vice versa. While this is a great feature, by default it’s configured to use a temporary 302 redirect instead of a 301 redirect. Change this value toYes (301 Moved Permanently)to make sure link authority from incorrectly placed links is passed on as much as possible to the right URL. - Under Search EngineSearch Engine
A search engine is a website through which users can search internet content.
Learn more Optimization you’ll find the fieldUse Web Server Rewriteswhich is by default set toYes. Keep it this way, as this determines that your store gets to use readable URLs.
Remove the .html extension from product URLs and product-category URLs
By default, Magento adds the .html extension to all URLs. It’s recommended to remove the .html extension to prevent potential issues further down the road, when switching to a different eCommerce platform.
Only remove the .html extension if you're starting from scratch, as removing it for an active Magento store leads to a URL migration, which you want to avoid as much as possible.
The secret to defining a great URL structure is to think ahead. When you’re migrating to a different platform, you want to minimize the differences between both platforms.
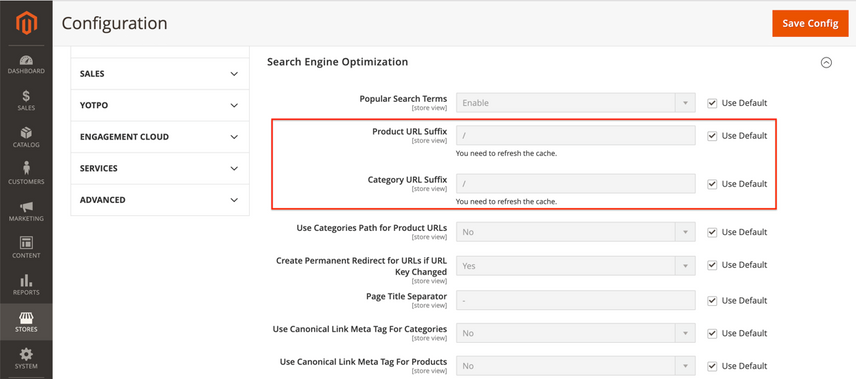
To remove the .html extension from the URLs, log on to your Magento backend and navigate to:
Stores>Configuration(underSettings) >Catalog>Catalog>Search Engine Optimization.- At the top of the page, select the right Store View you want to adjust the settings for. In our example this is
Default Store View. - In the screen that this loads, you'll find the fields
Product URL SuffixandCategory URL Suffix. Both fields have the value.html. Removing that value from both fields will lead to URLs such ashttps://example.com/categoryfor category pages, andhttps://example.com/productfor product pages. If you prefer to have a trailing slash at the end of all URLs, you can fill in/in both fields, leading to URLs likehttps://example.com/category/andhttps://example.com/product/.
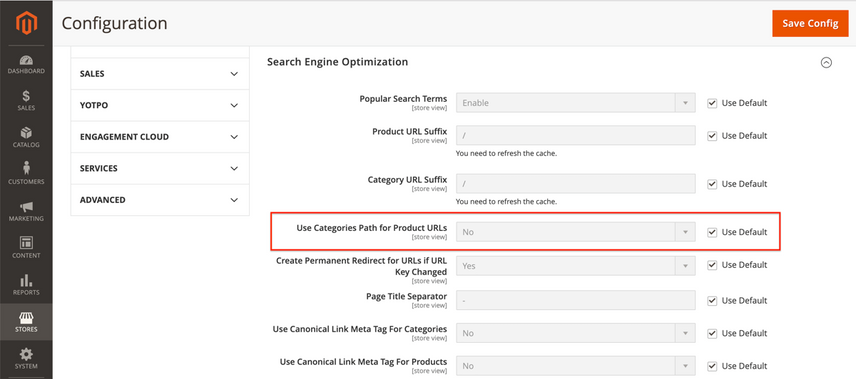
Keep URLs short by not including categories in URLs
In that same screen, you can choose whether or not to include the product-category key in a product’s URL, for example: https://example.com/category/product/.
By default, Use Categories Path for Product URLs is set to No. Keep it that way to ensure that URLs stay short. This is especially important if you have categories with subcategories; URLs will become very long quickly. If you have products with highly similar names, it's recommended to include a unique identifier such as the SKU in a product's URL. Out of the box, you can't configure this in the Magento 2 backend, but you can use an extension for this.
Automatically redirect URLs if the key changes
In cases where URL keys change after pages have been published, you want to redirect visitors and search engines to the right URL when they request the old URL.
By default, this is turned on: Create Permanent Redirect for URLs if URL Key Changed is set to Yes. Keep it like this, it’ll save you a lot of headaches down the road.

Defining meta information
Your page title and meta descriptionMeta Description
The meta description is one of a web page’s meta tags. With this meta information, webmasters can briefly sketch out the content and quality of a web page.
Learn more have a big impact on both your rankingsRankings
Rankings in SEO refers to a website’s position in the search engine results page.
Learn more and, when your page is shown in the SERP, your click-through-rate (CTR) as well. At the same time, you can’t manually define a title and meta description for each page, so you need to be smart about that. You need to use smart defaults, which can then be overwritten if need be.

What makes for a good title?
A good title is easy to read, contains important keywords, has a call to action, is unique, and has a length between 285 and 575 pixels (30 and 60 characters respectively).
What makes for a good meta description?
What goes for the title goes for the meta description, except that the preferred length is different. Keep the meta description between 430 and 920 pixels long (70 and 155 characters respectively).
Define the homepage meta information
To define the homepageHomepage
A homepage is a collection of HTML documents that can be called up as individual webpages via one URL on the web with a client such as a browser.
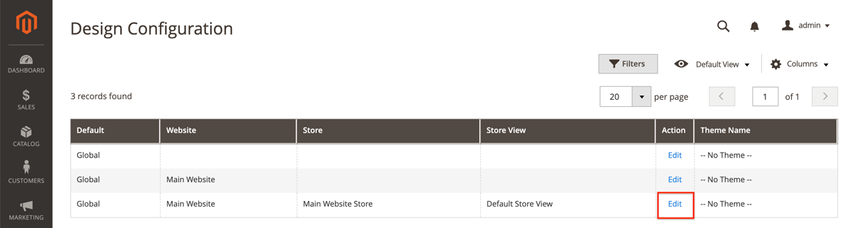
Learn more meta information, log on to your Magento backend and navigate to:
Content>Configuration(underDesign)- There, look for
Default Store Viewand click theEditlink after it to adjust the Default Store View homepage’s meta information.
Scroll down to HTML Head under Other Settings and expand the setting options:
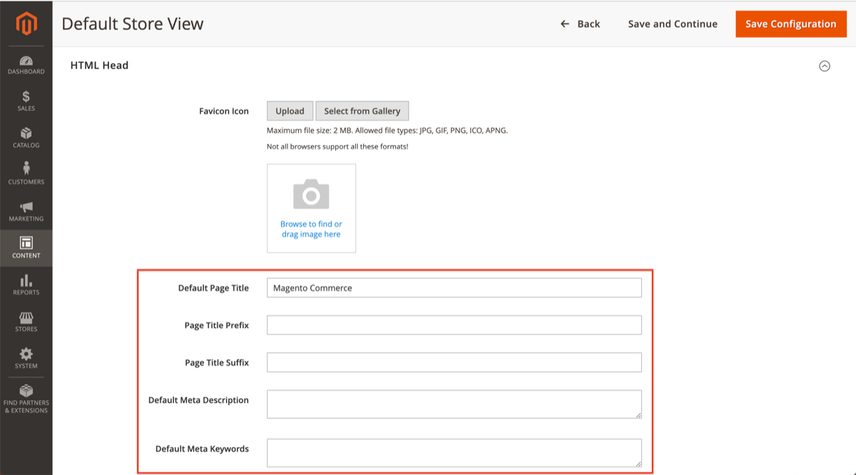
You can ignore the Default Page Title and Default Meta Description fields, as they aren't used within Magento by default. Ignore the Default Meta Keywords field as well, as meta keywords haven’t been used by search engines for over a decade. They play no role in SEO.
The two remaining fields, Page Title Prefix and Page Title Suffix do matter:
Page Title Prefix: you want to keep this field empty, as whatever you add there is added at the start (the most important part) of the title. Having a generic prefix goes against everything we know about the title tag, so keep it empty.Page Title Suffix: fill in- $shopName, for example:- ContentKing. This will be added at the end of every page title, which helps you from a branding point of view.
Define meta information templates for products and categories
Defining meta information templates for products and categories, which take up the lion’s share of a store’s pages, is what will save you the most time here.
Regrettably, this is a feature Magento itself lacks. It wasn’t available in Magento 1, and it isn’t available in Magento 2 either. Therefore, we recommend using an extension such as “Meta Tags Templates by Amasty ” or “SEO Meta Templates by MageWorx ”.
Here are some sample page title templates you can use:
- Category pages:
$categoryName | $shopName– so for example: “T-shirts for men | Joe’s T-shirts”. - Subcategory pages:
$subcategoryName | $categoryName | $shopName– so for example: “Breaking Bad T-shirts | T-shirts for men | Joe’s T-shirts”. - Product detail pages:
Buy $productName | $subcategoryName | $shopName– so for example: “Buy Mr. White T-shirt | Breaking Bad t-shirts | Joe’s T-shirts”. Here we’re deliberately leaving out$categoryName, as that would often make the title too long.
Here are sample meta description templates you can use:
- Category pages:
Looking for $categoryName? Check out our massive selection of $amountOfProducts T-shirts at $shopName!, so for example: “Looking for T-shirts? Check out our massive selection of 10,431 T-shirts at Joe’s T-shirts”. - Subcategory pages: use the same template as mentioned above for category pages.
- Product detail pages:
Buy a $productName starting from $productPrize. Shipping time: $shippingTime. Only at $shopName!, so for example: “Buy a Mr. White T-shirt for as little as $19.99. Shipping time: 24 hours. Only at Joe’s T-shirts!”.

Templating the creation of essential SEO elements, such as the title, meta description and H1 heading, is a vital time-saving exercise when increasing the number of categories on your eCommerce store.
If you name categories based upon the primary keyword that you've found from keyword research and then generate titles based upon that, you're setting yourself up to perform well from the get-go.
Once you've created your title tags based upon templates, don't forget to go back and manually tweak top performers to target additional keyword variations to increase traffic further!
Define meta information templates for other pages
For other pages, such as landing pages and About Us, you can use the following templates:
- Page title:
$pageName - $companyName, for example: “About Us - Joe’s T-shirts” - Meta description:
Check out our $pageName page!, for example: “Check out our About Us page!”
Note that the suggested templates won’t work for every business, and they may not fit your style. Let them simply be an inspiration to you.
Using headings correctly
Whether headings are used correctly in your Magento store depends on two things:
- How headings are structured within your theme.
- How you use headings in your content – which is entirely up to you.
Here’s a quick refresher:
A good heading structure helps visitors quickly scan a page, and helps search engines easily understand its structure and topic.
Stick to these heading best practices:
- Don’t wrap logos or images within H1 heading tags, as the H1 heading conveys the main topic of the page. Therefore, the H1 heading should include meaningful text.
- Use only one H1 heading per page.
- For readability, stick to a maximum heading length of
60characters. - Don't use headings for global elements that are present on every page, such as for example search functionality.
- Don't apply H2 headings to product names on product category overview pages.
- Build up your heading structure with a logical hierarchy, as illustrated below.
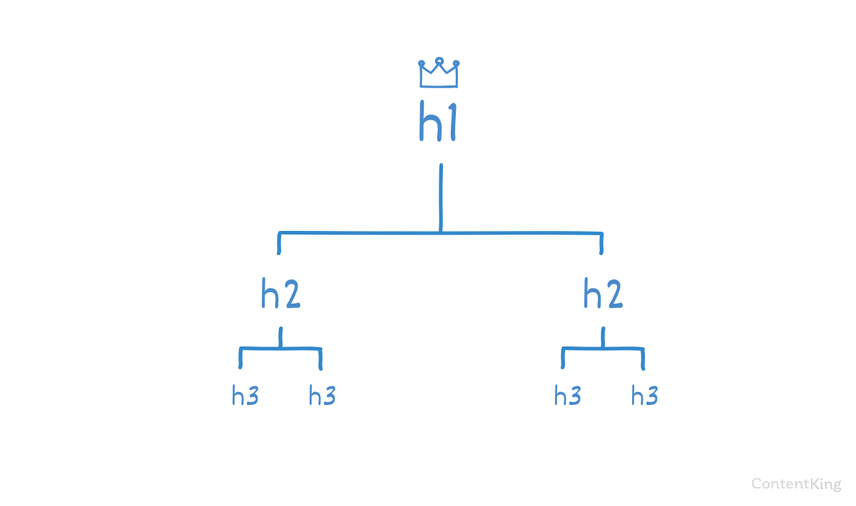
- Be smart about your product-category, product, and page names, because these names will be used as the H1 headings by default.
- Don’t use H1 headings in the body content, because that will lead to having multiple H1 headings (see above).

The proper use of page headings provides a clear and identifiable structure and hierarchy to the content on your pages, both from a technical and visual perspective.
Having properly structured page headings not only makes it easier for search engines to understand the content and structure of your pages, it also makes it much easier for users to scan your content and find the content that is relevant to them. For example, if a user is looking to find out the delivery costs of a product - make it as easy as possible for them to find this information by properly structuring your content.
But it isn't just about Google and SEO, it's also about improving the web for everyone. By implementing a good heading structure, you allow screen readers to read out the content in a defined way, making the web a more accessible place.
Crawling & Indexing
This section describes how you need to configure Magento to make it easy for search engines to crawl your store, and to understand what they need to indexIndex
An index is another name for the database used by a search engine. Indexes contain the information on all the websites that Google (or any other search engine) was able to find. If a website is not in a search engine’s index, users will not be able to find it.
Learn more and what not.
Implement canonical URLs for homepage and CMS pages
By default, Magento doesn't add self-referencing canonical URLs to its homepage and CMS pages. This means, you're at risk of having duplicate contentDuplicate Content
Duplicate content refers to several websites with the same or very similar content.
Learn more.
In order to fix this, you have several options:
- You adjust the template to always include the self-referencing canonical URL for the homepage and CMS pages.
- You add a custom XML block to pages, where you manually define the self-referencing canonical URL for the homepage and CMS pages.
- You use a plugin for this, like for example this one .
Turn on the use of canonical URLs for products and categories
Canonical URLs give search engines a strong hint as to what page they need to index. So in a case where you have one product with multiple variants, and you want to signal to search engines that they are to only index the product page, and not the variant pages, then you can do so with the canonical URL.
By default, the use of canonical URLs is turned off in Magento. With this setting turned off, a product is available through both its own URL and a URL that includes the category: https://example.com/product/ and https://example.com/category/product/. This leads to situations where these pages are competing with each other for a search engine’s attention.
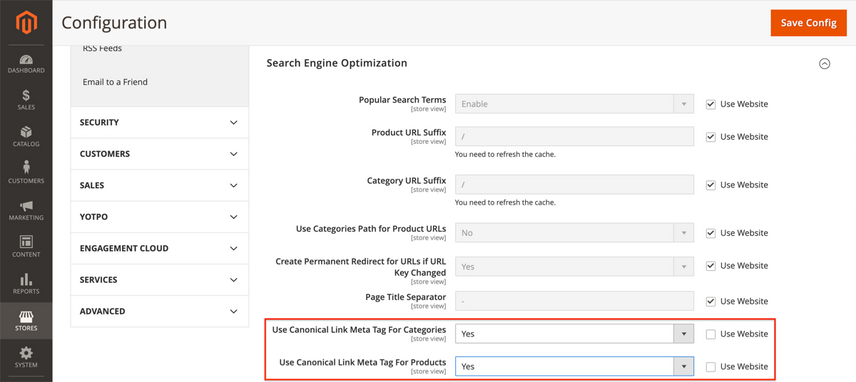
To turn on the use of canonical URLs, log on to your Magento backend and navigate to:
Stores>Configuration(UnderSettings) >Catalog>Catalog>Search Engine Optimization.- At the top of the page, select the right Store View you want to adjust the settings for. In our example, this is
Default Store View. - In the screen that this loads, you’ll find fields named Use Canonical Link Meta TagMeta Tag
Meta tags are areas in HTML code that contain information about a website.
Learn more For Categories andUse Canonical Link Meta Tag For Products. Change their values toYes. This will result in both product and product-category pages having canonical URLs, which significantly helps to prevent duplicate content.

Instead of creating product variations (e.g. different color, size, etc.) living on separate pages, create one product with options to choose from. In Magento, it’s called a configurable product .
If you do, you'll have high-quality pages and won't need to worry about writing unique descriptions for the same items that have different colors.
Use robots directives to prevent duplicate content
Robots directives communicate your preferences regarding crawling and indexing to search engines. Especially for larger sites – which eCommerce stores often are – robots directives are essential to SEO success.
Apply the noindex robots directive to internal search result pages
By default, internal search resultSearch Result
Search results refer to the list created by search engines in response to a query.
Learn more pages in Magento 2 are robot-indexable. That’s bad from an SEO point of view, as this can lead to an enormous number of low-quality pages being crawled and indexed when there are links pointing to these pages (be these internal, or external).
We recommend adding the noindex, follow robots directive to all internal search result pages.
Apply the noindex robots directive to URLs with query parameters
eCommerce platforms are notorious for generating tremendous numbers of URLs because of query parameters. In Magento 2, URLs with query parameters are indexable by default. And that’s not a good thing.
For example, if you’re on a product-category page and you’re filtering on prices between $10 and $20, you’d be sent to to a URL such as https://example.com/category/?price=10-20. You don’t want that URL to be indexed, because it’s just showing a subset of the category products.
Sorted pages are another example: say you want to see the products in a category from cheapest to most expensive. You’d be sent to a URL such as https://example.com/category/?price=10-20&product_list_order=price&product_list_dir=asc. This page just shows the same products in a different order. This adds no value from an SEO point of view, so you don’t want these pages to be indexed either. The same goes for choosing to see more or fewer products on a page. That will add a query parameter to the URL too, leading to a URL such as: https://example.com/cateogry/?product_list_limit=30.
There are no native settings in Magento to manage the robots directives for pages such as these, so you either need to have this custom-developed and/or add a Layered Navigation Extension .
Besides adding a noindex robots directive, we recommend preventing search engine crawlersCrawlers
A crawler is a program used by search engines to collect data from the internet.
Learn more from accessing URLs with these query parameters in the first place as described in the robots.txt section.
Use an XML sitemap
XML sitemaps are an efficient way to communicate to search engines what pages they need to crawl and index.
The best practices around XML sitemaps are as follows:
- Keep the XML Sitemap up to date with your website’s content.
- Only include indexable pages.
- Don’t list more than 50,000 URLs in a single XML Sitemap.
- Make sure the sitemap’s (uncompressed) file size doesn’t exceed 50MB.
- Reference the XML sitemap in the robots.txtRobots.txt
Robots.txt file is a text file that can be saved to a website’s server.
Learn more file.
Magento 2 comes with XML sitemap functionality. To configure the XML sitemap, log on to your Magento backend and navigate to:
Stores>Configuration(underSettings) >Catalog>XML Sitemap.- At the top of the page, select the Store View you want to adjust the settings for. In our example this is
Default Store View.
Including categories, products, and CMS pages in XML sitemap
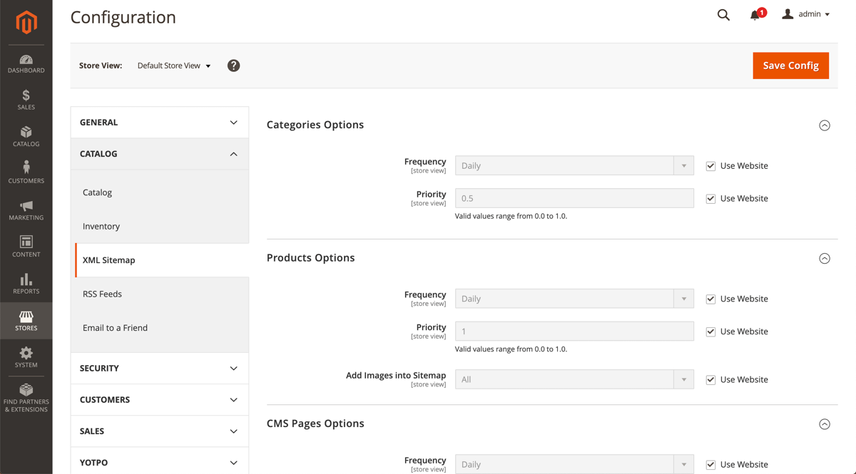
By default, the options for categories, products and CMS pages are configured correctly. Google doesn’t use the Frequency and Priority hints, so there’s no need to change anything there. By default, images are included in the XML Sitemap as well.
XML sitemap generation Settings
At the top of the page, select Default Config for Store View to manage the generation settings for the XML sitemap. The page will reload, and when you scroll down a little, you’ll see that you can define if, when, and how often the XML sitemap needs to be regenerated under Generation Settings.
By default, the Enabled field is set to No. Change this to Yes, because you want your XML sitemap to be regenerated automatically.
Setting Start Time to 02:00:00 will ensure the XML sitemap is regenerated at 2 AM. This is just an example; change this value to the quietest time of day for your store, as regenerating the XML sitemap can temporarily make your Magento store slower.
Keep the value of the Frequency field set to Daily to make sure the XML sitemap is regenerated every day. This too is just an example: if the content on your store only changes once a week, it makes more sense to regenerate the XML sitemap once a week.
XML sitemap: limits and robots.txt
Things get interesting down below; under Sitemap File Limits, you’ll find the fields Maximum No of URLs Per File and Maximum File Size.
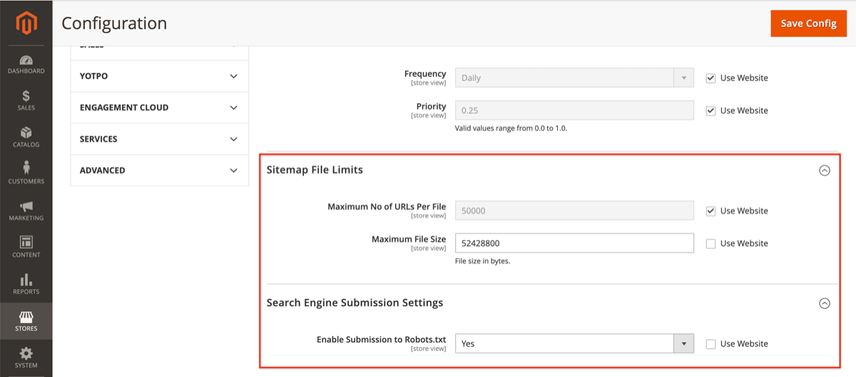
XML sitemap: Maximum No of URLs Per File
For most Magento stores, the default Maximum No of URLs Per File limit is correct as it aligns with SEO best practices.
In case you're running into indexing issues, it can be useful to temporarily split up your XML sitemap into more files so you can better pinpoint the indexing issues. For example, if you have 200,000 products split into four XML sitemaps and you're encountering indexing issues, checking the Sitemap's coverage report in Google Search Console doesn't tell you that much. Dividing those 200,000 products up in say 20 XML sitemaps gives you better insights.
Alternatively, you could create separate XML sitemaps per product category to help pinpoint indexing issues within product categories.
XML sitemap: Maximum File Size
You can raise the maximum file size to 52428800, as this equals 50 MB.
XML sitemap: Enable Submission to Robots.txt
Under Search Engine Submission Settings you’ll find the field Enable Submission to Robots.txt, which has a default value of No. Switch this to Yes, as you want your robots.txt file to reference your XML sitemap.
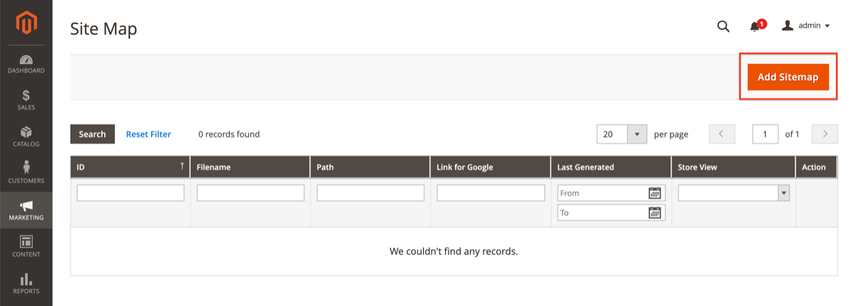
Once this is all set up, it’s time to create the XML sitemap and configure its (re)generation settings. To do this, go to Marketing > Site Map (under SEO & Search) and click the orange Add Sitemap button.
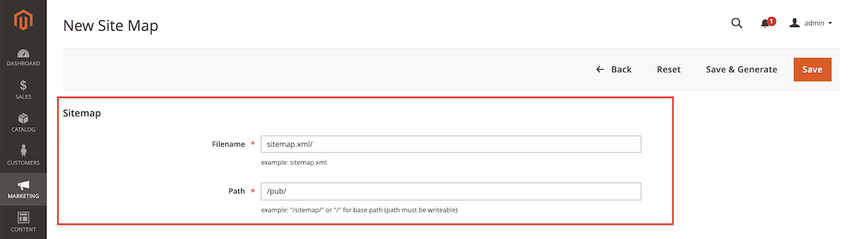
In the screen that follows, you define the XML sitemap’s name and location:
- Fill in the XML Sitemap’s name in the field
Filename, example:sitemap.xml. - Then fill in the XML sitemap’s path in the
Pathfield – for example/pub/in our case because of the nature of the Magento installation in our test setup. - Next, click the
Save & Generatebutton, and you’re all done!
Robots.txt
The robots.txt file tells crawlers the rules of engagement when it comes to accessing URLs on your site. For eCommerce stores – and so this goes for Magento stores too – it’s essential to leverage the robots.txt file to send search engine crawlers in the right direction, and keep them from touching the wrong URLs in an effort to
- Keep them from reaching potential crawler traps.
- Prevent duplicate content.
- Preserve precious crawl budget.
While search engines claim to be good at recognizing crawler traps, they first need to go down one in order to find out only later that it is in fact a crawler trap.
Your Magento 2 store has a variety of URL patterns that you don’t want search engines to touch.
Here are the pages we recommend barring off from search engines:
- Internal search result pages:
/catalogsearch/and/search/. While we recommend adding the robots noindex directive (either the meta tag or HTTP header) to these pages as a second line of defense, the first line of defense is the robots.txt file. - Login pages
/customer/account/login/– login pages. - URLs containing
SIDandPHPSESSIDparameters. - Filtering criteria such as
price,color,materialandsize.
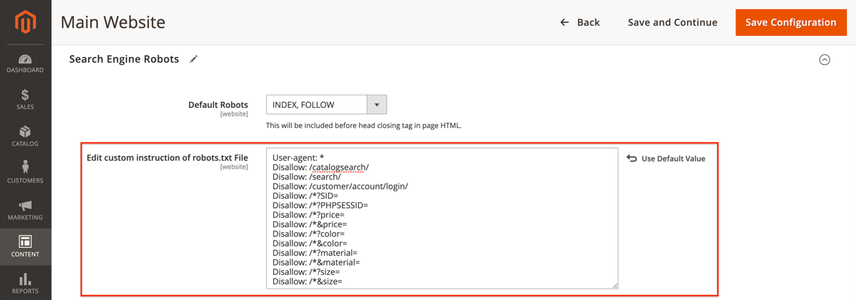
This boils down to the following robots.txt:
User-agent: *
Disallow: /catalogsearch/
Disallow: /search/
Disallow: /customer/account/login/
Disallow: /*?SID=
Disallow: /*?PHPSESSID=
Disallow: /*?price=
Disallow: /*&price=
Disallow: /*?color=
Disallow: /*&color=
Disallow: /*?material=
Disallow: /*&material=
Disallow: /*?size=
Disallow: /*&size=
We recommend including both ways a criterion is included in URLs. For example, with price that’s both /*?price= and /*&price=.
Editing your robots.txt file in Magento 2
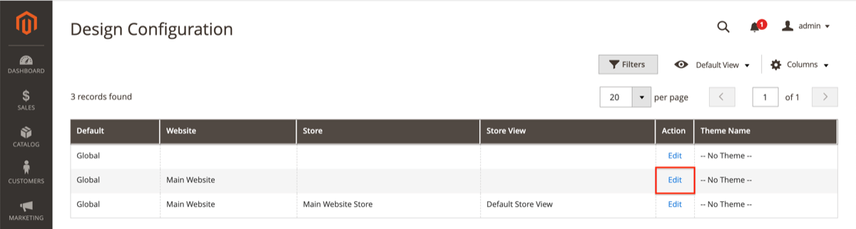
In order to edit your robots.txt file in Magento 2, navigate to:
Content>Configuration(UnderDesign).- There, edit the settings for
Main Websiteinstead of theDefault Store View, because the latter won’t allow you to change the robots.txt file.
On the screen that follows, scroll down to Search Engine Robots. There you can define your robots.txt content:
Important
Note that you shouldn’t change the value of Default Robots, as that’s the site-wide robots directive value.
Faceted navigation
When we’re discussing crawling, indexing, and filters, we also need to touch on faceted navigation.
Faceted navigation refers to how visitors can search through your products. Product filters, for instance, are part of faceted navigation. While we recommended earlier that you add noindex robots directives to your filtered product pages, and also exclude them through robots.txt, what if people are searching for a certain subset of your products, say all black "Breaking Bad t-shirts"?
In that case, you need to make that subset of your products available for search engines by creating a subcategory for it. Do this for all product subsets where it makes sense to do so.
This way you can cater to a larger audience, just by being smart about your product categories.
You shouldn't apply the robots noindex directive together with canonicalizing these pages to other pages, as this sends a confusing signal to search engines.

It’s all-too easy to handle faceted navigation badly. Any site with thousands of SKUs will need to carefully plan how to “spend” their crawl budget, ensuring search engine’s time is focused on the right things.
The trick is to lock down facets tightly, right from the start. In one case a few years ago, a 4,000 page site had a new faceted navigation deployed (handled really badly). Within two weeks, the number of indexed pages skyrocketed to 250,000 and climbing. The impact this had? Overall visibility dropped 57% and the site took nearly six months to recover.

Magento 2 is a powerful platform that comes with a few built-in SEO features. If you rely solely on those default features, without custom coding, 3rd party extensions and a solid SEO strategy, it's not likely you'll get the results you're aiming for.
That's why I always recommend starting with detailed research and performance analysis. It will not only provide you great information on the structure of your website, but it also helps you prepare a strategy for handling all those faceted navigation URLs. Although you'll probably want to leave the majority of these pages on noindex (to avoid thin content issues), there might be some hidden gems within these combinations that are worth indexing.
With just a little bit of customization and unique content, these filtered pages will allow you to rank on certain mid-tail and long-tail keywords that will attract additional users to your website.
So, don't guess or apply the same rule across different websites, do the research and make data-driven decisions!
Use pagination attributes
By default, Magento isn’t using the prev/next pagination attributes link on paginated pages to explain the relationship among these pages. While Google has said they no longer need this attribute to make sense of a series of paginated pages, there are still other search engines out there. There’s nothing against using it, and we recommend adding it if it only requires a small investment in time.
For example, if you’re already using a SEO plugin such as SEO toolkit that contains this functionality, and it’s just a matter of switching it on: go for it!
Stick to these best practices when it comes to pagination:
- Apply self-referencing canonicals to paginated pages.
- Don't apply noindex robots directives to paginated pages.
- Don't disallow paginated pages through your robots.txt.
HTML sitemap
Using an HTML sitemap helps both visitors and search engines discover important pages. For large Magento stores, you can for instance set up HTML sitemaps for the most important categories, sub-categories and most popular products.
Contrary to Magento 1, Magento 2 doesn't come with the functionality to generate an HTML sitemap. Therefore, you'd need to either build one yourself, or use a plugin for it. In other sections, we've already come across Amasty's SEO Toolkit extension a few times. It supports generating HTML sitemaps as well.

HTML Sitemaps are useful for both search engines and visitors. They improve the overall crawl process, and allow visitors to easily find your most important pages.
For small stores it's recommended to create one HTML sitemap listing all of the categories, and for larger stores it's advisable to create multiple HTML sitemaps. These HTML sitemaps can then cover sub-categories and list the most important products as well.
Please note: HTML sitemaps aren't a replacement for a solid information architecture!
Site speed
Magento requires quite some server resources to run smoothly, so having a solid, Magento-optimized hosting platform is essential to the success of your Magento store.
But you won’t get far with “muscle” alone; you need to configure both your hosting and your Magento platform correctly in order for it to take.
Requirements for your hosting platform
For best performance, your hosting platform needs to be:
- Optimized for Magento
- Ready to support Redis and Varnish
- Running on Nginx
- CDN compatible
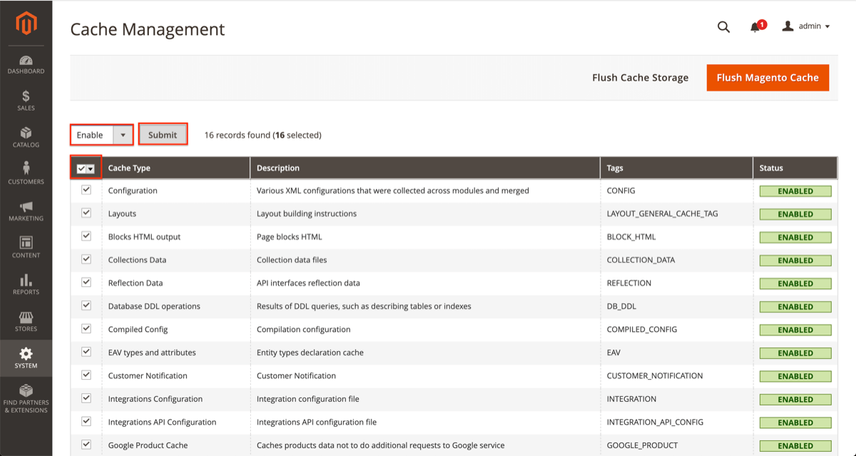
Enabling caching features
To enable the built-in caching features in Magento:
- Navigate to
System>Cache Management - Mark all checkboxes, select
Enablefrom the drop-down box, and hitSubmit:
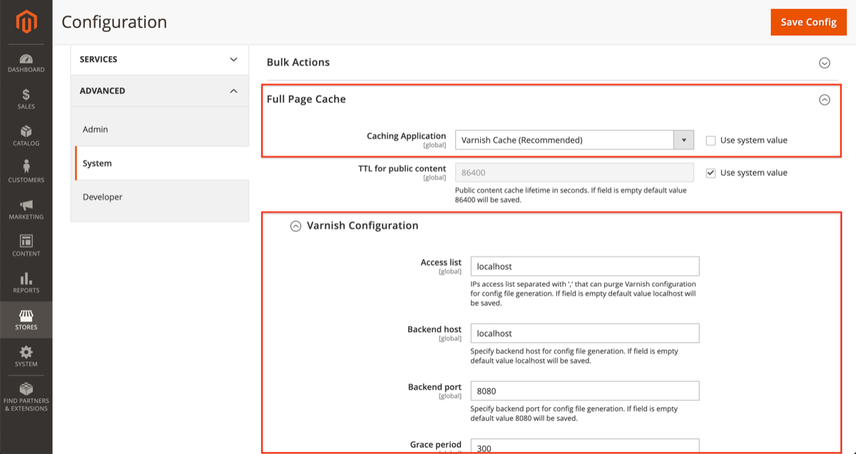
Enabling Full Page Cache in Magento 2
To enable full page caching:
- Navigate to
Stores>Configuration(underSettings) >Advanced>System. - Under “Full Page Cache”, you’ll find the
Caching Applicationfield. By default, it’s set toBuilt-in Cache. Change that toVarnish Cache (Recommended). - Next, an additional settings screen named
Varnish Configurationappears. There, you fill in whatever your hosting provider has provided you.
Configure JavaScript settings in Magento 2
Configure your store’s JavaScript settings by going to Stores > Configuration (under Settings) > Advanced > Developer.
There, expand JavaScript Settings and change the value of Merge JavaScript Files, Enable JavaScript Bundling, Minify JavaScript Files to Yes:
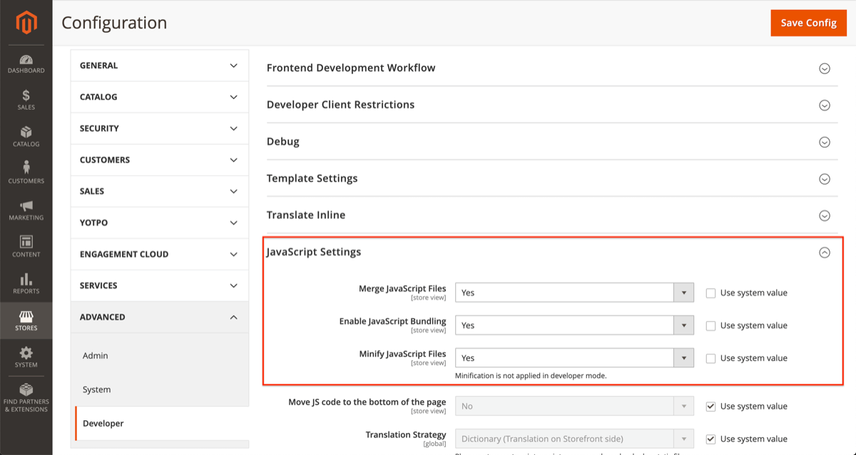
While this helps speed up loading of pages for simple, out of the box, Magento implementation it doesn't do much for more complex implementations.
As soon as you introduce your own JavaScript and third party plugins, simply merging and bundling JavaScript files adds little to no value. Therefore, Magento is working on a module called Baler which enables you to configure advanced JavaScript bundling.
For instance, you can create separate bundles for JavaScript that's required on all pages, category pages, product pages, landing pages and so on. This way, you only load what's really needed, rather than loading everything just in case it's needed. Thanks for your input on this Marnix Lont and Karen Foesenek !
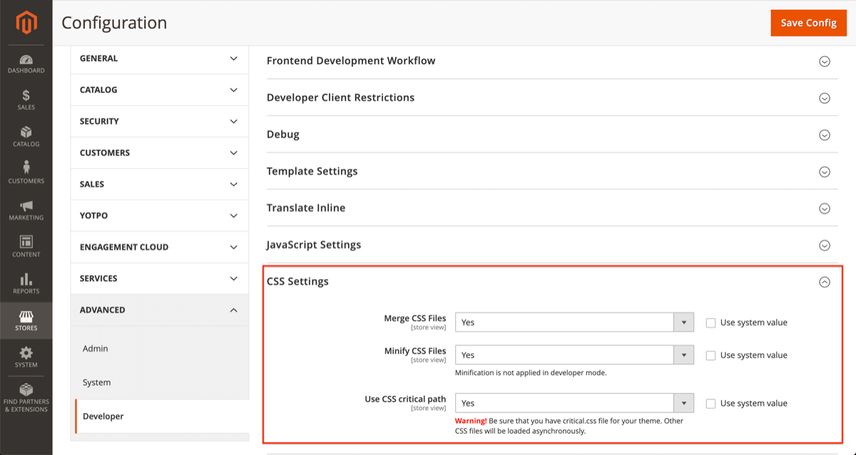
Configuring CSS settings in Magento 2
The configuration settings for your CSS files are located under the JavaScript settings in the same screen.
Expand CSS Settings and change the values of Merge CSS Files and Minify CSS Files, and – if your theme supports this – set Use CSS critical path to Yes:
Configuring Image settings in Magento 2
Configure your image settings by going to Stores > Configuration (under Settings) > Advanced > System.
There, expand Images Upload Configuration at the bottom and change the values for Maximum Width and Maximum Height according to your preferences.
Example: the image dimensions in your template have a maximum width of 600 px and a maximum height of 300 px. In that case, you can set those sizes for the maximum width and height. If you also have support for retina screens, you can double the sizes, leading to a maximum width of 1200 px and a maximum height of 600 px.
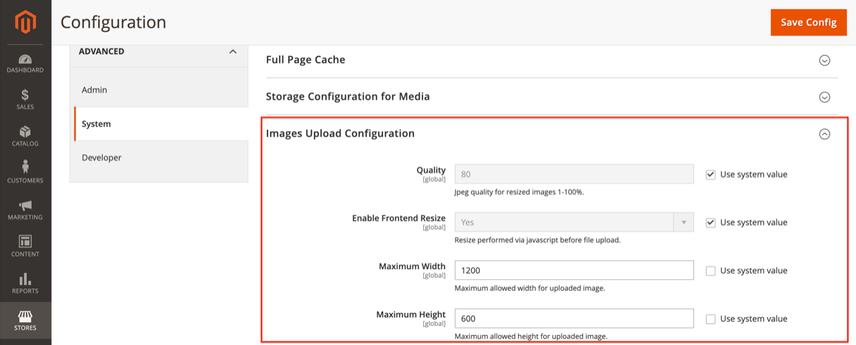
By doing this, you avoid serving unnecessarily large images to your visitors.
Configuring Image Processing
Configure the Image Processing Adapter by going to Stores > Configuration (under Settings) > Advanced > Developer.
There, expand Image Processing Settings and change the value of Image Adapter to ImageMagick. The ImageMagick adapter is considered the best adapter as it makes for the best quality images.
Be sure to flush the Catalog Images cache for this change to become active.
Applying other best practices
Other best practices to speed up your Magento store that you can apply:
- Using a Content Delivery Network (CDN).
- Limiting the number of JavaScript libraries that are loaded.
- Optimizing your images using image compression tools, usage of the Webp image format and applying lazy-loading to images below the fold.
A note on Index Management
Refreshing indexes takes its toll on the Magento platform, so be careful not to refresh indexes after saving every change.
Personally, we’re fans of the Hypernode platform thanks to their performance, configuration flexibility, and support.
HTTPS
Serving your visitors over a secure connection is a precondition for success – and it’s fully supported by Magento. Especially for eCommerce stores, using HTTPS is essential, because it all comes down to earning – and keeping – your visitors’ trust.
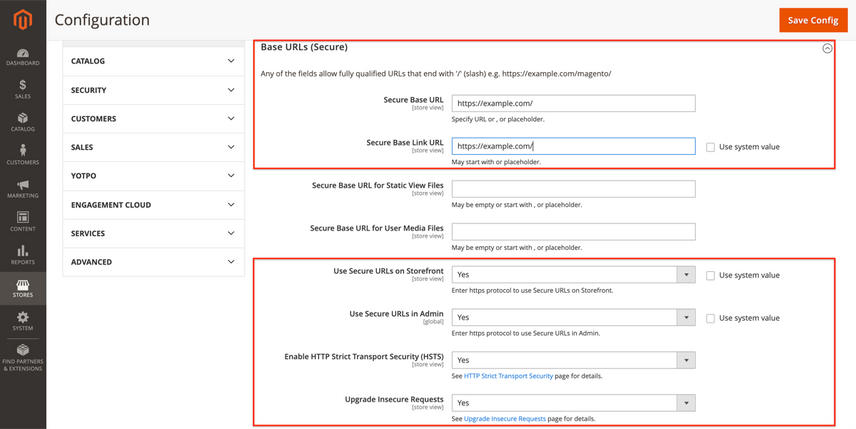
Enabling HTTPS in Magento 2
Configure your image settings by going to Stores > Configuration (under Settings) > General > Web.
There, expand Base URLs (Secure) and change the values of Secure Base URL and Secure Base Link URL so that they start with https.
Furthermore, change the value of the Use Secure URLs on Storefront, Use Secure URLs in Admin, Enable HTTP Strict Transport Security (HSTS) and Upgrade Insecure Requests fields to Yes.
What's next after building a solid technical foundation?
With a solid technical foundation, you've put yourself in the position to win.
So what's next?
Now, you need to leverage that technical foundation by making sure search engines find content that's relevant to the queries you want to rank for. You'll find tough competitionCompetition
Businesses generally know who their competitors are on the open market. But are they the same companies you need to fight to get the best placement for your website? Not necessarily!
Learn more along the way, so you need to make sure your content is the best out there. And you need to make sure other people think the same by gaining links to your content.
In short, you need to work on the other two pillars of SEO: Relevance and Authority & Trust by:
- Doing Keyword Research, and devising a Keyword Strategy.
- Devising a Link Building Strategy.
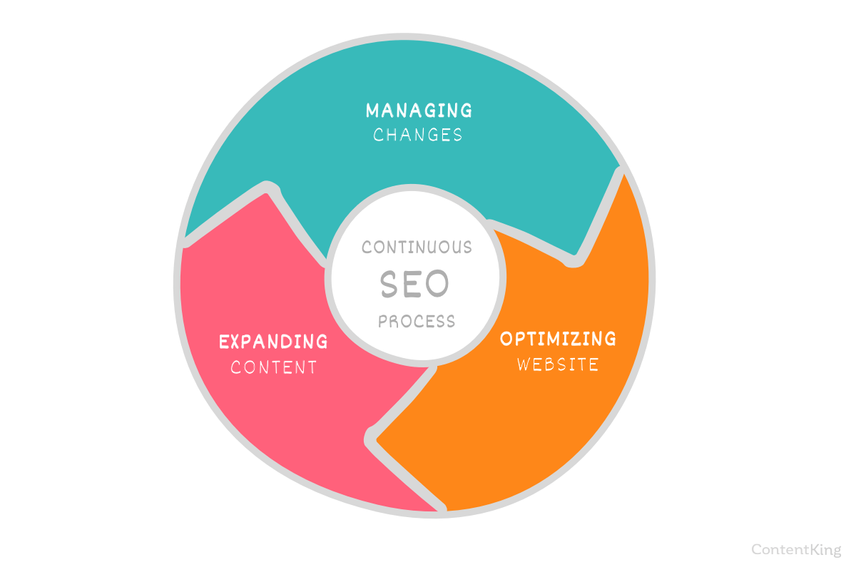
These aren't set it stone, you need to continuously re-evaluate, expand and improve them. SEO is a continuous process, as we've been saying for years. Learn more by going through our Continuous SEO Framework!
Frequently asked questions about Magento 2
How do I define a SEO friendly URL structure?
In the Magento backend, go to Stores > Configuration (under Settings) > General > Web. There you can define the settings for the URL structure. Specifically, pay attention to the sections Url Options and Search Engine Optimization.
If you'd like to remove the .html extension, head over to Stores > Configuration (under Settings) > Catalog > Catalog > Search Engine Optimization.
How do I make the most of Magento 2 for SEO?
To get the best SEO performance out of Magento 2, focus on getting the configuration right for:
- URL structure
- Meta information
- Headings
- Faceted navigation
- Crawling & Indexing
- Site speed
- HTTPS
Getting this technical foundation right first puts you in the position to start winning at SEO
Can I make Magento 2 load fast?
Yes, but you'll need to put in some effopeort. First of all, you need a solid, Magento optimized hosting platform that supports Redis and Varnish. Ideally, it's CDN compatable and running on Nginx. You'll need to activate and configure Magento's Caching and Full Page Caching features, and we also highly recommend using Magento's Baler module for advanced JavaScript bundling.
Can I configure the robots.txt in Magento 2?
In the Magento 2 backend, go to Content > Configuration (Under Design). There you can edit the settings for 'Main Website' instead of the Default Store View, because the latter won’t allow you to change the robots.txt file. Wondering what to include there? Check out this robots.txt example.